

Understanding the importance of clean metal before you begin any automatic welding, semi-automatic welding or manual process is key to a strong end result. Skipping the metal preparation step is one of the most overlooked tasks in the welding process, but it shouldn’t be! You run the risk of failing quality inspections or end up with ugly—or even weak welds.
Material preparation will vary depending on what type of tools you have such as automatic welding equipment, rotary welding systems, TIG welding cells or if you are welding manually. It will also depend on what type of metals you are using. Read on to get our general best-practice tips on how to prepare metal before welding.
Keep it Clean
Beginning with clean, debris-free material is the best way to ensure positive outcomes. Before using an automated welding system, remove any paint, oils, grease or rust. Here are a few common tools used to clean metal:
- Sandpaper
- Abrasive blasting
- Stainless steel brushes
- Solvents such as acetone or other alkaline cleaners
Avoid creating any deep scratches when cleaning your material as removing too much material from the metal can result in poor weld quality and costly rework. Always organize your cleaning utensils and keep ferrous and nonferrous tools separate. Cross-contamination can occur when the wrong cleaning tool is used.
Removing Oxide Layers
If you’re welding with aluminum, it can add an extra element of difficulty due to the nature of the metal. Aluminum has a greater risk to develop weld problems— such as lack of penetration—due to the tough oxide layer. Other metal materials may also have a coating on them to avoid rust during shipping. Oxidation can from quickly, so it’s best to clean small areas at a time right before the automatic welding process begins.
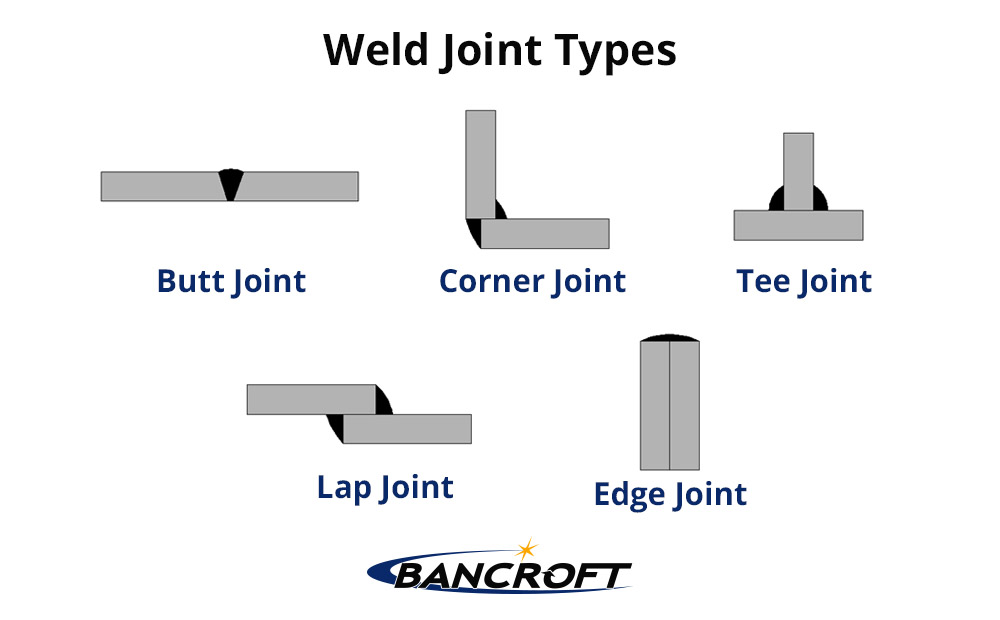
Joint Preparation
Preparing the metal’s edge is a critical step that allows the filler metal and part edge to fuse together without melting. Depending on your parts, one of these basic weld joints should be used:
- Butt joint: parts are on the same plane and they are joined at their edges.
- Corner joint: parts form a right angle and are joined at the corner of the angle.
- Tee joint: one joint is at a right angle, while the other resembled the letter “T.”
- Lap joint: formed with two overlapping parts.
- Edge joint: joints are parallel with each other and are joined at the seam.
Proper Storage
A major challenge is preventing indirect material contamination from dust or other airborne particles floating through your shop floor. While you can’t stop dust and dirt completely, here are a few material storage tips to keep in mind:
- Store in a dry location
- Ensure minimum temperature fluctuation
- Cover materials with plastic or thin sheets of cardboard
Automatic Welding Systems
No matter what type of welding you are performing, it’s important to take the time to prepare your material before you get started. It’s worth the extra effort to get a strong weld that also looks perfect!
Bancroft Engineering designs and builds welding equipment such as rotary welders, weld lathes, seam welders and much more out of Waukesha, WI—specializing in stand-alone machines to fully robotic automated systems. Need help automated your welding process? Give us a call at 262-786-1880, or email: sales@bancrofteng.com to get started.


